Pages

Monday, November 28, 2011

Craft Room 3.0

This post has been a long time coming.  I LOVE looking at other people's rooms, especially rooms where they create, so I hope you will enjoy a peek into mine. Some of you may remember Craft Room 1.0, which became slightly famous in Flikr land.  Well, when we moved, Craft Room 1.0 had to be taken down and moved to our new house.  Craft Room 2.0 was never really finished and probably never photographed.  It had yellow walls which were pretty and it was pretty big.  HERE is what Craft Room 2.0 looks like now!  We moved bedrooms upstairs with the coming of Amelia, so that meant CR2.0 had to move downstairs.  Well, enough chit chat - come on in!

 My mother-in-law gave me the sewing room sign and button heart.  The framed pattern is actually some scrapbook paper I found.  The best thing to do with beautiful scrapbook paper is to frame it and hang it!

The view right as you walk in.  I do my photo editing at that desk.  Josh gave me the Degas repro painting last Christmas.  I love Degas, ballerinas, and Impressionist paintings.  This one is called Rehearsal of a Ballet on Stage.  Catchy, isn't it?  The cubes are all from Michaels or Joanns and are super perfect for building a desk.  The desk is a door painted green.  It's the perfect width to go across two cubes.  The To Do chalkboard is really a mirror from HomeGoods painted white and chalkboard paint.  When I first signed up for Pinterest, the first thing I wanted to do was chalkboard paint everything!

A better look at the far corner of the room.  The chair I planned on reupholstering looks good, right?  Too bad the sides and back aren't done!  It's only been a few years!  In that cabinet is most of my random crafting supplies.  I use plastic bins to keep things organized.

The other side of the room houses a closet where all my fabric is stored.  Yeah, we definitely aren't taking pictures in there at the moment! Josephine is hanging out by the window, wearing a shirt that's never going to be finished...
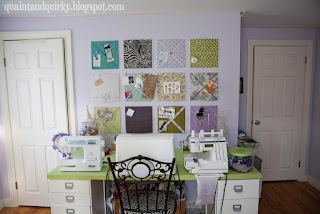
 Here's a full on shot of my sewing area and inspiration board.  The middle machine is my main machine.  Then the left hand one is the only machine I can get to do shirring.  The right hand machine is my serger.  The chair we reupholstered in zebra print fabric.  I love it!

The cubes are almost all different.  Here are some looks inside some drawers.  The top one is labeled, "embellishments."  The bottom one is labeled, "cutting tools."

Some organized scrapbook paper.
My Heather Bailey pear pin cushion, a flowery pin cushion from my bridal shower, some antique silk thread in a glass container, wire dress forms from Home Goods, and various other things (including the casings from the first time I fired a gun!).
The inspiration boards. 

I hope you enjoyed a peek into Craft Room 3.0!  Currently it is decorated for Christmas, so I might be back with some more pictures of Christmas Craft Room 3.0!

Thanks for looking!

Friday, November 25, 2011

Christmas Planner

Yay!  It's the Christmas season!  I like Thanksgiving a lot, but I LOVE Christmas!  I can't wait to decorate later on tonight!

I'd like to share an organizational project that I made last night.


First of all, many of the ideas are adapted from the blog eighteen25 - a REALLY fun blog to read!
They showed how to make Christmas planners out of composition notebooks.  2011 Planners

I liked theirs a lot, but I wanted to change it. I wanted a notebook that would last me several years, where I could keep track of the presents I gave, etc.  I also wanted to use my Zutter machine and make it spiral bound.  Finally, several of their tabs weren't relevant to me.  I don't do the menu planning for any special events, nor do I completely understand what their "Card" tab is for. 

Oh, and I wanted to use graph paper because I hate horizontal lined paper.  I need to write on zero lines (plain copy paper) or too many lines (graph paper).  But that's just me being weird (err...quirky!).

ANYWAY...
I decided on 4 tabs - Calendar, To Do, Christmas List, and Projects. 

  • I cut some 8.5x11 paper (copy and graph) down to 5.5x 7.85.  I used the copy paper for calendar and projects and graph paper for To Do and Christmas List.  I stuck a piece of scrapbook paper at the beginning of each section and attached a tab indicating the section.  The paper I cut for the tab was 2x2, but I folded it in half to make it 1x2. 
  • I cut two manilla file folders to 6x8 to use as the covers.  I adhered scrapbook paper to the file folder and decorated the cover a bit. I also used some translucent plastic I had for organizing scrapbook paper to serve as a protective cover.  I cut it to 6x8 with my paper cutter.  
  • I bound all that with the zutter and 3/4" coil. 
  • I attached a bell with ribbon - mostly for decoration, but slightly so I could find it in my bag or diaper bag!  Sheepish grin!
  • For the envelopes inside, I bought 6x9 inch envelopes at Staples, but they were a bit too big for my book.  After I bound the book, I cut the envelops on the sides and bottom to fit the inside covers and I sewed around the three edges to keep it secure.
  • I printed out the calendar pages from here (same place as eighteen25, but I opted for a month calendar instead of weekly ones).
  • Added a few graphics and strips of scrapbook paper, and I was good to go with my new Christmas planner!


It would be easy to recreate with a small spiral notebook or a composition book like eighteen25 did.  Their graphics are really cute, but they are year specific.  If anyone would like the graphics I used, please send me an email to quaint and quirky at gmail dot com or leave a comment with your email address and I'll send you the file!  I can put the words in black, red, green, or multicolored like I used!
I'm adding this to the tatertots and jello weekend link up party!

Wednesday, November 23, 2011

Super simple baby dress - or "Make it Work"

Amelia needed a new dress Sunday morning.  Ummmmmm... maybe "needed" is a strong word.  Anyway, I made one Sunday morning before church.  Sort of...

I had a skirt in a bigger size made from the Oliver + S tutorial found here:  Lazy Days Skirt
I had given it a regular hem on the bottom though - not a ribbon hem as was shown.

When I tried it on Amelia, I found that it fit her torso and the length was fine.  I used the same fabric to cut out two 3.5 inch wide by ??? inches long (I just overestimated) strips of fabric.  I sewed long ends together to form a tube, turned them inside out and pressed it with the seam in the center back.

I tried the dress on again, used safety pins to determine where the straps should go on the front and the back and sewed them onto the dress (I finished the ends of the straps with my serger, but you could just turn the raw edge in and sew it closed on both ends).
Note:  I left a significant tail in the back for the straps so that I can reuse this dress as a shirt next year and lengthen the straps as needed.

I had this owl from a scraps tutorial I had previously done, so I topstitched it in place.
Tutorial here: Scrap embellishment tutorial .

What's the point of this blog post?  Make it work.  Not every project has to be perfectly laid out, planned, and executed.  Sometimes it's fun to work with what you have and improvise.  Try it.  It's freeing!

I hope you all have a great Thanksgiving!  I'll be back to show you a fun Christmas present wrapping idea I had! 


Friday, November 18, 2011

Dear Amelia

Dear Amelia,


Yesterday, I read you 1,714 books.  Actually, it wasn't 1,714 different books.  It was about seven different books that added up to 1,714 times.  And most of the books weren't stories.  They were books of pictures that either you or I pointed to and I said the name.  So I couldn't even act it out or sing it or assign new voices. Every time you handed me a book, you climbed your chubby body into my lap and snuggled in to listen to the most fascinating book in the world to you.

By the end of the day, I felt like I couldn't read (if you call it that) ONE MORE BOOK.

But then I thought -

There's going to be a day where I'd give anything for you to snuggle your body into my lap to listen to a book.

And there are moms out there who would do anything to get the opportunity to read their child one more book.

And there are people out there who would do anything to have a child to read a book to.

And I was humbled.  And I would love to read you My First Word Board Book as many times as you want (and even more!).
For the curious, this frilly dress girl is reading a Red Sox board book.  :D

Thursday, November 10, 2011

A Present for Ezra

My friend Tara's little boy Ezra turned one at the beginning of November.  The theme of the party was Birthday Monsters which Tara pulled off amazingly well.  I'm sure she will be blogging about it soon!
  I'm a girl who likes a party theme, so I had to make something to go along.  I had the idea of making a reverse applique bag for his books and toys.  THEN my idea got out of control but I had a better idea.  I did the reverse applique so that it looks like the monsters came crashing out of the bag and are causing havoc. 
It started as this:
 An orange t-shirt I bought at Target and various other knits/items waiting for repurpose.

It turned into this:
I was very happy with it and I hope the birthday boy will get good use out of it!

The back:

Thanks for looking!

Adding this to I Heart Naptime's Link party!
Link Party

LinkWithin

Related Posts with Thumbnails