Pages

Showing posts with label Tutorials. Show all posts

Thursday, October 11, 2012

Inside Out Skirt Tutorial

As promised, here is my Inside Out Skirt tutorial!  You can see the original Inside Out Skirt here.

To start with, you will need fabric, tulle, and elastic.
Here's how to calculate what you need.  For elastic, you will need a waist measurement.  I can just measure Amelia's waist, but I usually reference the following standard clothing size charts:

The Children's Place - good for skirt length
Gymboree - good for waist measurement and inseam length

The waist measurement is pretty important because the width of the fabric you need will be double the waist measurement.  I used 20" of elastic for this skirt.  That means I need fabric that is 40" wide.  [When using a 44" fabric, I usually don't bother cutting off the extra 4" - it just makes it a tad more full.]  If you want less full, use less than half.  [Confession:  This skirt is actually less than 40" wide and I definitely think I would have preferred a fuller skirt.]

For length, you take the finished measurement you want and add 2.5 inches.

For the tulle, you need the same width as the underskirt fabric.  Then you need the length of the skirt multiplied by 4 (so you will have four layers of tulle on top of your skirt).  Here is an illustration, with the measurements I used in brackets.


Step one:  Cut everything out.


Step two:  Sew the underskirt.  I used my serger for this project.  If you do not have a serger, you will just need to do a few extra steps.
1.  Serge the bottom edge (no serger - fold under 1/2," then press).
2.  Fold up the bottom edge so that you've used 1" for the hem and press (no serger - fold up another 1/2," then press)
Wrong side of the skirt showing

2. Sew in place, close to the serged edge.
3.  Serge the top edge (no serger - fold under 1/2," then press).
4.  Sew the short sides of the skirt together (the back seam) using 1/2" seam allowance.
5.  Fold over approximately 1.5 inches and press.
Wrong side of the skirt showing

6.  Sew in place close to the serged edge, leaving approximately 2 inches NOT sewn near the back seam.
7.  Top stitch close to the top edge of the skirt.
Right side of the skirt showing
At the end of this step, you should have a hemmed skirt with a casing at the top, but you do NOT insert the elastic yet.  Set the skirt aside to work on the tulle.

Step four - make a tulle tube
1.  Take the tulle and sew the back seam using a 1/2 inch seam allowance.  This is the loooooong side.  Essentially, you are sewing the side of the skirt that is 4 times longer than it will be at the end. 
The side I sewed, was the 48" side, using my measurements from above.
2.  Cut off most of the seam allowance.


3.  Now take the tulle and fold it in half, then in half again. Make sure you line up the seam.  When you are done, the top of the skirt will have 2 folds and the bottom of the skirt will have one fold and two loose ends.  Make sure that you fold so that the RIGHT side of the tulle ends up on the outside! 
See my purple striped sock? 
 4.  Now slide the tulle over the underskirt so that the 2 folds end of the tulle tube is at the top of the skirt and the back seam of the tulle lines up with the back seam of the skirt.  The tulle should be considerably longer than the underskirt.  This is okay.  You will give it a tulle cut later.

5.  Pin the tulle on the underskirt.  I like to place the folded edge of the tulle about 1/2 way between the two stitching lines at the top of the skirt.

6.  Stitch over the existing seam on the skirt.  That way, you keep the casing for the elastic big enough to put the elastic through!  Make sure you leave the 2 inches unsewn that you left when sewing the underskirt!


Now you should have one skirt, tulle on top, underskirt on bottom.
 Step six - Time to finish!
1. Insert the elastic through the casing.
I like to anchor one side of the elastic to the skirt with a small safety pin.

2.  Overlap the ends of the elastic by about 1 inch and sew the ends of the elastic together securely.
3.  Sew the remaining 2 inches closed on the skirt.
4.  Cut the tulle at the bottom to the desired length, either longer than the underskirt, the same length, or shorter!  I experimented with this skirt.  See the pictures below!

4.  DONE!  Take cute pictures and send them to me!

In the above skirt, the tulle is longer than the skirt.
Then, during a potty break, I cut the tulle shorter than the underskirt.
Barrette for sale in my shop!

One more - 'cause she's cute!


Friday, December 9, 2011

Streamer Ruffle Christmas Trees

Can you take one more streamer ruffle idea???  How about some streamer ruffle Christmas trees?
To see the ruffled gift wrap or to see how to make ruffled streamers, go to this post:  Ruffled Streamers.

 I started with some green and white ruffled streamers, styrofoam trees, and some pins.  It took me about 8-9 feet of ruffled streamer to go over the large tree.


To do the green and white one, you should place the streamer at the bottom of the tree with the white streamer overlap on top and the white part facing up.
Pin in place to secure, then start wrapping!  Make sure you go over the bottom of the tree so that you cover the Styrofoam.  When you get to the top of the tree, form the top into a point and secure with another pin.  Done!!!
The green one is just one streamer gathered at one edge and wrapped around.  It gave it a lot more volume, so that's another technique you can try!

Of course, I had to make a snow scene to display the trees.  I decided to get out my Memere's (great grandmother) antique Christmas figures.
I displayed these every year as a child, but I'm afraid they have lead paint, so I won't put them out anymore.  They came out for a little shoot style though!
I actually think the pine cone elves would have been better, but I gave them all away!  Oh well!

A little yellow streamer star for the top!

Added to:Link Party

Monday, June 6, 2011

Baby Dress from Woman's Shirt - And a Giveaway

I'm into repurposing - making things out of other things .  Now that I have a baby girl, I see my cast off clothing in a totally different way.  Where I might have weeded through my clothing and thrown away or donated the castoffs, now I see everything as a potential baby item.  :D  It definitely takes more imagination!  THIS particular starting garment was never mine though.  It was a vintage woman's shirt I got for a dollar or so at the Brimfield Fair last year.  I <3 The Brimfield Fair.  Now it's a baby dress. 

This tutorial uses the Leila and Ben Sweet Little Dress pattern - one I've used over and over and over again.  I'm giving away a copy of the pattern to go along with this tutorial, so scroll to the end for instructions!

This shirt works for this pattern because it was wide to begin with, so if you are looking for a shirt to repurpose at a thrift store, look for a wide one!

Materials:
Start by washing and drying the shirt.  Then cut the shirt apart at the seams so that you have two big sleeve pieces and a big front piece and big back piece. If you are like me and are using a vintage piece, then feel guilty cutting it for a moment, then continue.

Center the dress piece on the buttons and pin.  You want to let the pattern hang off the bottom of the shirt a bit.  Since you don't need to hem it, you don't need as much length.  I was making the 12 month size and I used the 9 month dress length.

Cut along the side, sleeve, and top of the pattern. Don't cut down the middle though!  :D
Flip the pattern piece over and center again on the buttons.  Make sure the same amount of pattern is hanging off at the bottom.  Finish cutting out the dress.

Cut out the back as well, but this time you can cut it on the fold.

Lay out the existing sleeves and cut them open.  If you can use the hem of the existing sleeve, do so.  If you can't just cut the sleeve like you would normally do.
Notice that I'm once again extending the sleeve pattern past the fabric.  I'm using the hem of the sleeve, so I needed to take off some length.  If you aren't using the hem of the sleeve, then cut it like you would normally.

Next, I would baste the top of the dress so that all layers stay together during the construction of the dress.


Proceed according to the directions on the pattern.  The only other change is that if you used the shirt's sleeve hem, you won't need to fold the bottom of the sleeve twice.  Just fold it up 1/2 inch, press, and sew!
Here's Amelia in her new (old!) dress!  FYI, The headband is from the flower pin tutorial, except I serged the top edge after I cut the long skinny piece of fabric.  Then I sewed it on some satiny elastic from The Evil Joanns.


Now:  Giveaway!
I am giving away one Sweet Little Dress pattern (any size).  If you already have a Sweet Dress pattern, but like other Leila and Ben patterns, I will substitute another of equal value.  Just leave a comment on this post.  Want something to talk about?  Just tell me something you have that you'd like to repurpose.  Otherwise, just leave a comment.

Blog, facebook, or tweet a link to this giveaway and come back and leave another comment for another entry! (Leave up to four comments)
Here's a tweet for you to copy and paste:  

I entered @quaintandquirky 's pattern giveaway at http://tinyurl.com/6chacf6 
 
I will pick a winner Friday, June 10th at naptime!  :D

Enjoy!

Wednesday, June 1, 2011

Flower Pin Tutorial

This tutorial is meant to accompany my Book Bag tutorial, but the uses for this flower are endless.  Headbands, barrettes, belts, necklaces, pillow embellishment, skirt embellishment, etc.!

Enjoy.  It's an easy one.

Materials:
  • Long strip of fabric, 1 inch by approximately 40 inches.  Sometimes, to make a larger flower, I sew two together so it's 1 inch by 80 inches.  You could make it fatter too... 1.25 inches by ___ inches.  Play with it.  This flower is 1 inch by 40 inches.
  • Scissors
  • Thread
  • Needle
  • Pin back (or barrette, headband, whatever you are going to attach it to)
  • Small piece of wool felt

First, snip off any selvage ends.  Run a gathering stitch (either by hand or machine - I prefer machine) down one long side.  Gather until the fabric is about half the length that it was straight.

Next, cut a circle out of wool felt that is approximately 2 to 2.5 inches in diameter.

Take one end of the gathered fabric and begin to roll it to make the "bud."  After a few rolls, stitch the bottom of the bud a few times to secure it. 
Sew the bud to the center of the wool felt.

Now continue to spiral the gathered fabric a few inches at a time and sew it to the wool felt.

(TIP:  I spiral  the whole thing without sewing first to get a sense of how it will look.  Then I unwind it all and start sewing.)
Do this until you get to the end.  Before you sew the very end to the wool felt, fold the edge down so that you don't have a raw edge sticking out.
(folded edge)

Sew a pin to the back of the flower and you are finished!!

Use as a brooch, pin it to a bag, skirt, belt, etc.  Enjoy looking all fancy!

Friday, May 27, 2011

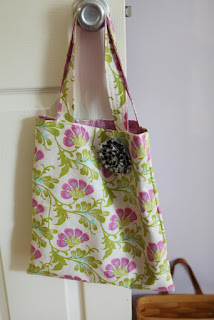
Simple and Quick Bag Tutorial (Reversible too!)

This bag truly is super easy and fast to put together.  It's a great last minute gift idea.  The concept of the bag is nothing mind blowing, but this tutorial is more about efficiency.  I've highlighted ways to make this bag making process even more efficient.  
Beginners:  this is a PERFECT project for you - all nice, easy straight lines.
Intermediate and advanced:  Whip this up in no time or add embellishments like contrasting fabric, ruffles, embroidery, etc.

Let's go!

Materials:
  • Approximately 1/2 yard each of two different fabrics
  • Scissors
  • Rotary cutter, mat, ruler (these are not necessary, but encouraged to save time!)
  • Thread and pins

Step One:  Cut
(I save time by cutting the fabrics all at once.  Then you know they are the same size too!)
Fold your two fabrics and place one on top of the other.  Using the fold, cut a 13" wide by 15" high rectangle.  IMPORTANT:  If your fabric has direction (like birds, for example), then you can't use the fold or else the back side of the fabric will be upside down (like dead birds, for example!).  Don't ask me how I know this.  Just don't!  So in that case, you would cut one rectangle 13" wide by 15.5 " high NOT on the fold!
Next, with the fabric still piled on top of each other, cut a long strip 2" wide by 21" long (don't cut on the fold).  You should have FOUR long strips (two in one fabric, two in the other).


Step Two:  Sew
I sew everything I can at once, then iron everything at once, etc. That way you aren't up-down-up-down-iron turned off-where's my water?-that toy doesn't belong there-what was I doing?-Oh yeah, sewing...
So, take one of the folded fabric rectangles and sew down the two long sides with about a 1/4" seam.  Take the other folded fabric rectangle and do the same. 
IMPORTANT:  If you have directional fabric, make sure you flip the rectangle, so that both sides are going up.  No dead birds!
Then take long handle strips and mix them so that you are sewing two different fabrics right sides together.  Sew up one long edge, pivot, sew across one short edge, pivot, and sew down the other long edge.  Repeat for other handle.  Turn inside out.  Use one of these inside outer tools. (Mine has seen better days!)
Best. Invention. Ever. (Besides the dishwasher and the epidural.  And the Magic Eraser.  But that's a post for another day!)

Step Three:  Iron
Take all pieces with you to the iron.  Iron down the straps so they are nice and flat.
You don't have to worry too much about getting the ends perfect.  They will be hidden.
Fold 1/2 inch of the top of the two bag pieces to the wrong side.  Press with iron.

Step Four:  Sew
Almost done!
Sit back down at the sewing machine.  You are going to topstitch the handles.  You are going to sew four long rows of stitches - close to each long edge and two rows evenly spaced down the middle.  I don't start and stop my sewing.  I just sew all four lines by pivoting when I get to the end of the strap.  The ends will be tucked inside, so it doesn't matter what they look like.  Repeat for second handle.

Pick which fabric you want to be the main outside fabric - the one you want showing most of the time.  Keep that one right side out.  Turn the other fabric inside out. You will be sewing these wrong sides together.  Put the inside fabric inside, match side seams, and pin together at the top. 
Tip:  Make sure the top fits exactly together.  If one piece is bigger, you will get wrinkles and overlaps when you sew it together.  Now is the time to fix it.  If one piece is bigger, unpin and sew another side seam to make it smaller. 
Figure out where you want your straps to go. I usually put mine around 2 inches from each seam. Tuck the ends of  the straps between the two layers of fabric you just pinned together.  Pin the straps in place.  Make sure they aren't twisted.   

For a different look, you could sew the straps with the contrasting fabric OUT! 
Sew around the whole top of the bag about 1/4" from the edge. 

Tip:  Take a look at the inside.  Make sure you caught the contrasting fabric in all the seams.  If you didn't, sew another seam and pretend it was intentional topstitching.

You are finished!!

Flower embellishment tutorial to come separately!

LinkWithin

Related Posts with Thumbnails